
Introduction:
Creating a Cinnamon Apple Tart involves several steps, each contributing to the final product’s delightful taste and appearance. This comprehensive guide will provide a full description of the process, from selecting the right ingredients to the finishing touches.
This tart features a buttery crust, a spiced apple filling, and a beautiful presentation that makes it perfect for any occasion.
Ingredients:
For the Crust:
- 1 1/2 cups all-purpose flour
- 1/2 cup unsalted butter, chilled and cubed
- 1/4 cup granulated sugar
- 1/4 teaspoon salt
- 1 egg yolk
- 2-3 tablespoons ice water
For the Apple Filling:
- 5-6 medium-sized apples (such as Granny Smith, Honeycrisp, or a mix)
- 1/4 cup granulated sugar
- 1/4 cup brown sugar
- 1 teaspoon ground cinnamon
- 1/4 teaspoon ground nutmeg
- 1/4 teaspoon ground allspice
- 1/4 teaspoon ground cloves
- 1 tablespoon lemon juice
- 2 tablespoons all-purpose flour

For the Topping:
- 2 tablespoons unsalted butter, melted
- 1 tablespoon granulated sugar
- 1/2 teaspoon ground cinnamon
Equipment Needed
- Tart pan (preferably with a removable bottom)
- Rolling pin
- Pastry cutter or food processor
- Mixing bowls
- Measuring cups and spoons
- Knife and cutting board
- Pastry brush
Step-by-Step Instructions
Making the Crust:
- Prepare the Dry Ingredients: In a large mixing bowl, combine the flour, granulated sugar, and salt. Stir until the ingredients are evenly distributed.
- Cut in the Butter: Add the chilled, cubed butter to the dry ingredients. Using a pastry cutter or your fingers, work the butter into the flour mixture until it resembles coarse crumbs. This step is crucial for achieving a flaky crust.
- Add the Wet Ingredients: In a small bowl, whisk together the egg yolk and 2 tablespoons of ice water. Gradually add this mixture to the flour and butter mixture, stirring with a fork until the dough begins to come together. If the dough is too dry, add an additional tablespoon of ice water.
- Form the Dough: Turn the dough out onto a lightly floured surface and knead it gently a few times until it forms a cohesive ball. Flatten the dough into a disk, wrap it in plastic wrap, and refrigerate for at least 30 minutes.
- Roll Out the Dough: After chilling, remove the dough from the refrigerator and let it sit at room temperature for a few minutes to soften slightly. On a lightly floured surface, roll the dough out into a circle about 1/8-inch thick and large enough to fit into your tart pan.
- Fit the Dough into the Tart Pan: Carefully transfer the rolled-out dough to the tart pan, pressing it gently into the bottom and sides. Trim any excess dough, leaving a slight overhang to account for shrinkage during baking. Prick the bottom of the crust with a fork to prevent puffing.
- Pre-bake the Crust: Preheat your oven to 375°F (190°C). Line the crust with parchment paper or aluminum foil and fill it with pie weights or dried beans. Bake for 15 minutes, then remove the weights and parchment/foil. Bake for an additional 5-7 minutes, or until the crust is lightly golden. Remove from the oven and let it cool slightly.
Preparing the Apple Filling:
- Prepare the Apples: Peel, core, and thinly slice the apples. Aim for uniform slices to ensure even baking. Place the apple slices in a large mixing bowl.
- Add the Flavorings: To the bowl of apple slices, add the granulated sugar, brown sugar, ground cinnamon, ground nutmeg, ground allspice, ground cloves, and lemon juice. Toss the apples until they are evenly coated with the spices and sugars.
- Thicken the Filling: Sprinkle the all-purpose flour over the apple mixture and toss again. The flour will help thicken the juices released by the apples as they bake, preventing a soggy crust.
Assembling the Tart:
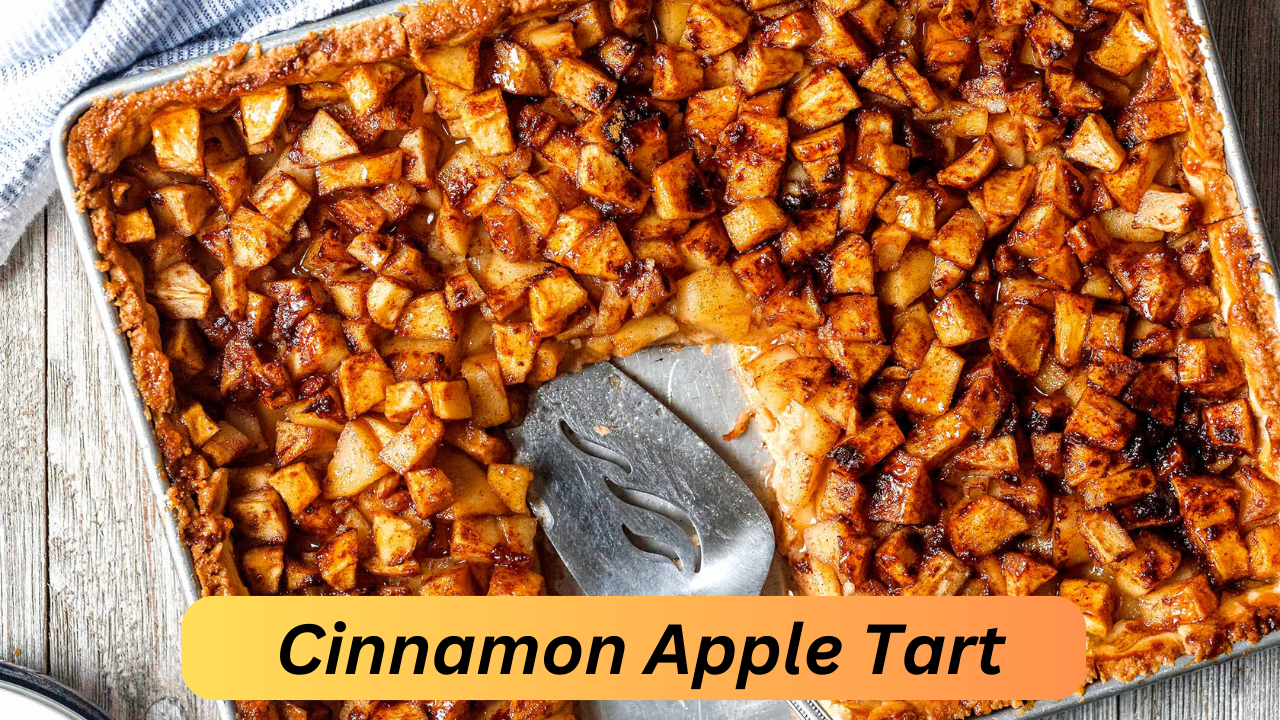
- Arrange the Apples: Starting from the outer edge, arrange the apple slices in concentric circles, overlapping them slightly. Continue layering the apples in a spiral pattern until you reach the center. This step is essential for creating an attractive presentation.
- Add the Topping: In a small bowl, mix the melted butter, granulated sugar, and ground cinnamon. Using a pastry brush, evenly spread this mixture over the arranged apples.
Baking the Tart:
- Bake the Tart: Preheat your oven to 350°F (175°C). Place the assembled tart in the oven and bake for 45-50 minutes, or until the apples are tender and the crust is golden brown. If the edges of the crust begin to brown too quickly, cover them with strips of aluminum foil.
- Cool the Tart: Remove the tart from the oven and allow it to cool in the pan for about 10 minutes. Then, carefully remove the tart from the pan and transfer it to a wire rack to cool completely.
Serving the Tart
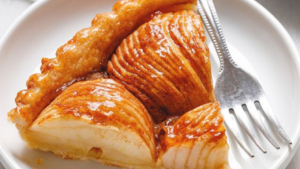
- Slice and Serve: Once the tart has cooled, use a sharp knife to slice it into wedges. Serve the tart as is, or with a dollop of whipped cream or a scoop of vanilla ice cream for added indulgence.
- Storage: Store any leftovers in an airtight container at room temperature for up to 2 days. For longer storage, keep the tart in the refrigerator for up to 5 days, though the crust may lose some of its crispness.
Tips and Variations
- Choosing the Right Apples: The type of apples you use will significantly affect the tart’s flavor and texture. Tart apples like Granny Smith hold their shape well during baking, while sweeter varieties like Honeycrisp or Fuji add natural sweetness. Using a combination of different apples can provide a more complex flavor profile.
- Enhancing the Crust: For an extra layer of flavor, consider adding a teaspoon of vanilla extract or a pinch of ground cinnamon to the dough. You can also experiment with different types of flour, such as whole wheat or almond flour, to create a unique crust.
- Adding a Glaze: For a glossy finish, brush the baked tart with a simple apricot or apple jelly glaze. Warm the jelly in a small saucepan until it melts, then brush it over the apples while the tart is still warm.
- Incorporating Nuts: Adding a handful of chopped nuts, such as walnuts or pecans, to the apple filling can provide a delightful crunch and enhance the tart’s flavor. Simply sprinkle the nuts over the apple slices before baking.
- Spice Adjustments: Feel free to adjust the spices to suit your taste. Adding a bit of ground ginger or cardamom can give the tart a unique twist. Always taste the apple mixture before assembling the tart to ensure the spice levels are to your liking.
- Making Mini Tarts: If you prefer individual servings, you can make mini tarts using a muffin tin. Roll out the dough and cut it into smaller circles to fit the muffin cups, then proceed with the recipe as directed. The baking time may be shorter for mini tarts, so keep an eye on them.
Troubleshooting Common Issues
- Soggy Crust: A soggy crust can result from under-baking or an overly juicy filling. Pre-baking the crust and using flour to thicken the apple mixture can help prevent this issue. If your tart still turns out soggy, try adding a layer of ground almonds or breadcrumbs to the crust before adding the filling to absorb excess moisture.
- Burnt Edges: If the edges of the crust are browning too quickly, cover them with strips of aluminum foil during baking. This will allow the filling to cook without over-browning the crust.
- Uneven Baking: Unevenly sliced apples can lead to uneven baking. Take your time to slice the apples uniformly and arrange them carefully in the tart. Rotating the tart halfway through baking can also promote even cooking.
- Cracked Dough: If the dough cracks while rolling it out, it may be too cold. Let it sit at room temperature for a few minutes before rolling. If it cracks during transfer to the tart pan, patch it up with excess dough or press it gently together.
Final Thoughts
Creating a Cinnamon Apple Tart is a rewarding experience that combines the comforting flavors of apples and spices with the satisfying texture of a buttery, flaky crust. Whether you’re making this tart for a holiday gathering, a special occasion, or simply to enjoy with a cup of tea, the time and effort you put into each step will be evident in the delicious final product.
By following this detailed guide, you’ll be able to master the art of making a Cinnamon Apple Tart that not only tastes amazing but also looks impressive. Enjoy the process and savor each bite of your homemade tart, knowing that you’ve created something truly special.
Ingredients:
Watch full recipe video:
For the Crust:
- 1 1/2 cups all-purpose flour
- 1/2 cup unsalted butter, chilled and cubed
- 1/4 cup granulated sugar
- 1/4 teaspoon salt
- 1 egg yolk
- 2-3 tablespoons ice water
For the Apple Filling:
- 5-6 medium-sized apples (Granny Smith, Honeycrisp, or a mix)
- 1/4 cup granulated sugar
- 1/4 cup brown sugar
- 1 teaspoon ground cinnamon
- 1/4 teaspoon ground nutmeg
- 1/4 teaspoon ground allspice
- 1/4 teaspoon ground cloves
- 1 tablespoon lemon juice
- 2 tablespoons all-purpose flour
For the Topping:
- 2 tablespoons unsalted butter, melted
- 1 tablespoon granulated sugar
- 1/2 teaspoon ground cinnamon
Equipment
- Tart pan (preferably with a removable bottom)
- Rolling pin
- Pastry cutter or food processor
- Mixing bowls
- Measuring cups and spoons
- Knife and cutting board
- Pastry brush
Instructions:
1. Prepare the Crust:
- Mix Dry Ingredients: In a large bowl, combine 1 1/2 cups flour, 1/4 cup granulated sugar, and 1/4 teaspoon salt. Stir to mix.
- Cut in Butter: Add 1/2 cup chilled, cubed butter to the flour mixture. Using a pastry cutter or your fingers, cut the butter into the flour until the mixture resembles coarse crumbs.
- Add Wet Ingredients: In a small bowl, whisk together 1 egg yolk and 2 tablespoons of ice water. Gradually add this to the flour mixture, stirring with a fork until the dough begins to come together. Add an additional tablespoon of ice water if necessary.
- Chill Dough: Turn the dough onto a floured surface and knead gently until smooth. Flatten into a disk, wrap in plastic wrap, and refrigerate for at least 30 minutes.
2. Prepare the Apple Filling:
- Slice Apples: Peel, core, and thinly slice 5-6 apples. Place in a large bowl.
- Season Apples: Add 1/4 cup granulated sugar, 1/4 cup brown sugar, 1 teaspoon ground cinnamon, 1/4 teaspoon each ground nutmeg, allspice, and cloves, and 1 tablespoon lemon juice to the apples. Toss to coat.
- Thicken Filling: Sprinkle 2 tablespoons flour over the apple mixture and toss again. This will help thicken the juices released during baking.
3. Assemble the Tart:
- Roll Out Dough: Preheat your oven to 375°F (190°C). Remove the dough from the refrigerator and let it sit at room temperature for a few minutes. Roll out the dough on a floured surface into a circle about 1/8 inch thick.
- Fit into Pan: Transfer the dough to a tart pan, pressing it gently into the bottom and sides. Trim excess dough, leaving a slight overhang. Prick the bottom with a fork.
- Pre-bake Crust: Line the crust with parchment paper and fill with pie weights or dried beans. Bake for 15 minutes. Remove weights and parchment, and bake for an additional 5-7 minutes until golden. Let cool slightly.
- Arrange Apples: Starting from the edge, arrange apple slices in concentric circles, overlapping slightly, until the tart is filled.
- Add Topping: In a small bowl, mix 2 tablespoons melted butter, 1 tablespoon granulated sugar, and 1/2 teaspoon ground cinnamon. Brush this mixture over the apples.
4. Bake the Tart:
- Bake: Lower the oven temperature to 350°F (175°C). Bake the tart for 45-50 minutes, or until the apples are tender and the crust is golden brown. If the edges brown too quickly, cover with foil.
- Cool: Remove the tart from the oven and let cool in the pan for about 10 minutes. Then, carefully remove from the pan and transfer to a wire rack to cool completely.
Serving
- Slice and Enjoy: Once cooled, slice the tart into wedges. Serve as is, or with a dollop of whipped cream or a scoop of vanilla ice cream for a special treat.
Storage
- Room Temperature: Store leftovers in an airtight container at room temperature for up to 2 days.
- Refrigeration: For longer storage, keep in the refrigerator for up to 5 days. The crust may lose some crispness but will still taste delicious.
Tips and Variations
- Apple Choices: Use a mix of tart and sweet apples for balanced flavor and texture.
- Crust Enhancements: Add a teaspoon of vanilla extract or a pinch of cinnamon to the dough for extra flavor.
- Glaze Option: Brush a warm apricot or apple jelly glaze over the baked tart for a glossy finish.
- Nutty Twist: Add chopped nuts to the apple filling for added crunch.
Enjoy making and savoring your homemade Cinnamon Apple Tart!
FAQs:
1. What type of steak is best for this recipe?
- Answer: Ribeye is a top choice due to its marbling and rich flavor, but you can also use other cuts like filet mignon, New York strip, or T-bone. Choose a cut with good marbling for tenderness and flavor.
2. How do I get a perfect sear on my steak?
- Answer: Ensure the steak is dry before seasoning. Preheat your skillet over high heat, add a small amount of oil with a high smoke point (like canola or vegetable oil), and sear the steak for 2-3 minutes per side until a deep, brown crust forms.
3. Can I skip the searing step and cook the steak only in the oven?
- Answer: Yes, but searing the steak adds flavor and creates a delicious crust. If you prefer to skip searing, you can broil the steak in the oven for a few minutes to achieve a similar crust.
4. How long should I cook the steak in the oven?
- Answer: Cooking times vary based on steak thickness and desired doneness:
- Rare: 4-5 minutes
- Medium-Rare: 6-7 minutes
- Medium: 8-9 minutes
- Medium-Well: 10-11 minutes
- Well-Done: 12-14 minutes
- Use a meat thermometer to ensure accurate results.
5. What is the best way to check if my steak is done?
- Answer: Use a meat thermometer to check the internal temperature:
- Rare: 120-125°F (49-52°C)
- Medium-Rare: 130-135°F (54-57°C)
- Medium: 140-145°F (60-63°C)
- Medium-Well: 150-155°F (65-68°C)
- Well-Done: 160°F (71°C) and above
6. Why is resting the steak important?
- Answer: Resting allows the juices to redistribute throughout the meat, resulting in a juicier and more flavorful steak. If you cut the steak immediately after cooking, the juices will run out, leaving the steak dry.
7. How should I store leftover steak?
- Answer: Store leftover steak in an airtight container in the refrigerator for up to 3 days. Reheat gently in a skillet over medium-low heat or in the oven at 250°F (120°C) to avoid drying it out.
8. Can I make the garlic herb butter in advance?
- Answer: Yes, you can prepare the garlic herb butter ahead of time and store it in the refrigerator for up to a week or freeze it for up to 3 months. Bring it to room temperature before using.
9. What can I use instead of fresh herbs?
- Answer: Dried herbs can be used in place of fresh. Use about one-third of the amount called for in the recipe, as dried herbs are more concentrated. Adjust to taste.
10. How can I avoid a smoky kitchen when searing the steak?
- Answer: Use a high-smoke-point oil and ensure good ventilation by turning on the exhaust fan or opening a window. Preheat the pan properly and avoid overcrowding it.
11. Can I use a different type of butter for the garlic herb butter?
- Answer: Unsalted butter is best for controlling the salt level, but you can use salted butter if preferred. Clarified butter (ghee) can also be used for a richer flavor.
12. How do I slice the steak correctly?
- Answer: Slice the steak against the grain, which means cutting perpendicular to the direction of the muscle fibers. This makes the steak more tender and easier to chew.
13. What should I serve with Garlic Herb Butter Steak?
- Answer: Popular sides include roasted vegetables, mashed potatoes, a fresh green salad, or a baked potato. A glass of red wine like Cabernet Sauvignon or Merlot pairs well with this dish.
14. Can I use the same method for other meats?
- Answer: Yes, the garlic herb butter technique works well with other meats such as pork chops or chicken breasts. Adjust cooking times based on the type and thickness of the meat.
15. How can I reduce the garlic flavor if it’s too strong?
- Answer: Reduce the amount of garlic or use roasted garlic for a milder, sweeter flavor. Alternatively, use garlic powder for a subtler taste.

By following these answers, you’ll be able to troubleshoot common issues and enhance your Garlic Herb Butter Steak experience. Enjoy your delicious, oven-cooked steak!
Conclusion:
Cooking a Garlic Herb Butter Steak in the oven is a fantastic way to enjoy a restaurant-quality meal at home. By carefully selecting your cut of meat, seasoning it well, and using a combination of stovetop searing and oven roasting, you can achieve a perfectly cooked steak with a delectable garlic herb butter finish. Whether you’re cooking for a special occasion or simply treating yourself, this recipe is sure to impress.
Enjoy your cooking experience, and most importantly, savor every bite of your delicious Garlic Herb Butter Steak.